
Rooftop Corn Growing DIY: Imagine stepping onto your rooftop and harvesting fresh, juicy corn – a taste of summer right in the heart of the city! It might sound like a dream, but with a little know-how, you can transform your urban space into a thriving cornfield. For centuries, humans have cultivated corn, or maize, a staple crop deeply woven into the fabric of many cultures, especially in the Americas. From ancient civilizations using it for sustenance and rituals to modern-day chefs creating culinary masterpieces, corn has always held a special place.
But why should you consider rooftop corn growing DIY? Well, in today’s world, where access to fresh, locally sourced produce is becoming increasingly important, growing your own food offers a fantastic solution. Not only does it provide you with delicious, homegrown corn, free from harmful pesticides, but it also reduces your carbon footprint and connects you with nature in a meaningful way. Plus, let’s be honest, there’s something incredibly satisfying about nurturing a plant from seed to harvest. I’m excited to share some simple, yet effective, tricks and hacks that will help you successfully grow corn on your rooftop, even if you’re a complete beginner. Get ready to unleash your inner urban farmer!
DIY Rooftop Corn Growing: A Bountiful Harvest Above Your Head!
Okay, so you’re thinking about growing corn on your roof? Awesome! It might sound a little crazy, but with the right planning and a little elbow grease, you can absolutely have a mini cornfield swaying in the breeze above your house. I’m going to walk you through everything you need to know to make this happen. Get ready for some serious rooftop gardening fun!
Planning Your Rooftop Corn Patch
Before we even think about soil and seeds, let’s get the groundwork laid. This is crucial for a successful (and safe!) rooftop garden.
* Assess Your Roof’s Load Capacity: This is non-negotiable. Corn, soil, and water are heavy. You absolutely need to consult with a structural engineer or qualified contractor to determine if your roof can handle the added weight. Don’t skip this step! Safety first, always.
* Sunlight is Key: Corn needs at least 6-8 hours of direct sunlight per day. Observe your roof throughout the day to see where the sun hits and for how long. Choose the sunniest spot for your corn patch.
* Water Access: Hauling water up to your roof is a pain. Consider how you’ll get water to your plants. A hose connection is ideal, but if that’s not possible, think about a large water tank and a pump.
* Drainage, Drainage, Drainage: Standing water is a corn killer. Ensure your containers have adequate drainage holes and that your roof’s drainage system can handle the runoff.
* Wind Protection: Rooftops can be windy! Consider windbreaks, like trellises or sturdy screens, to protect your corn stalks from being blown over.
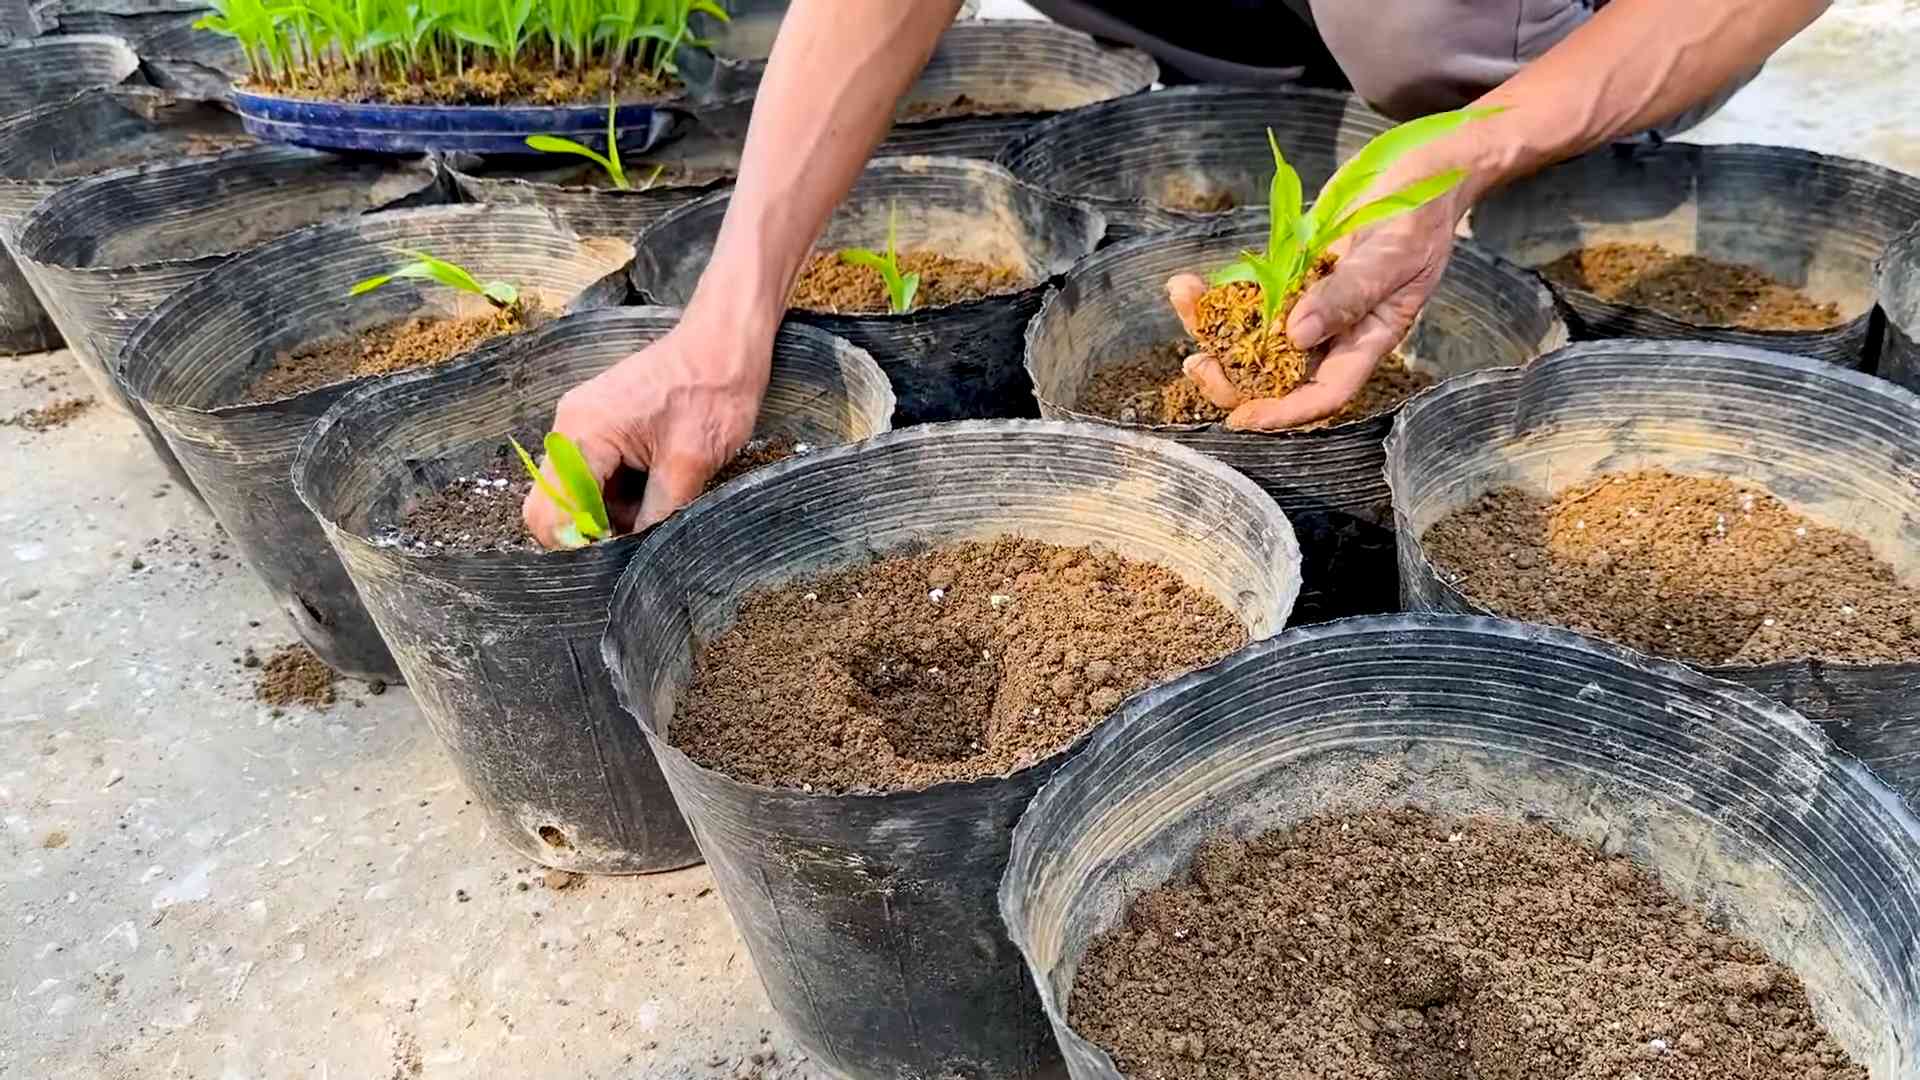
* Container Selection: Choose large, sturdy containers. I recommend at least 20-gallon containers per plant. Fabric pots are a great option because they allow for good drainage and airflow.
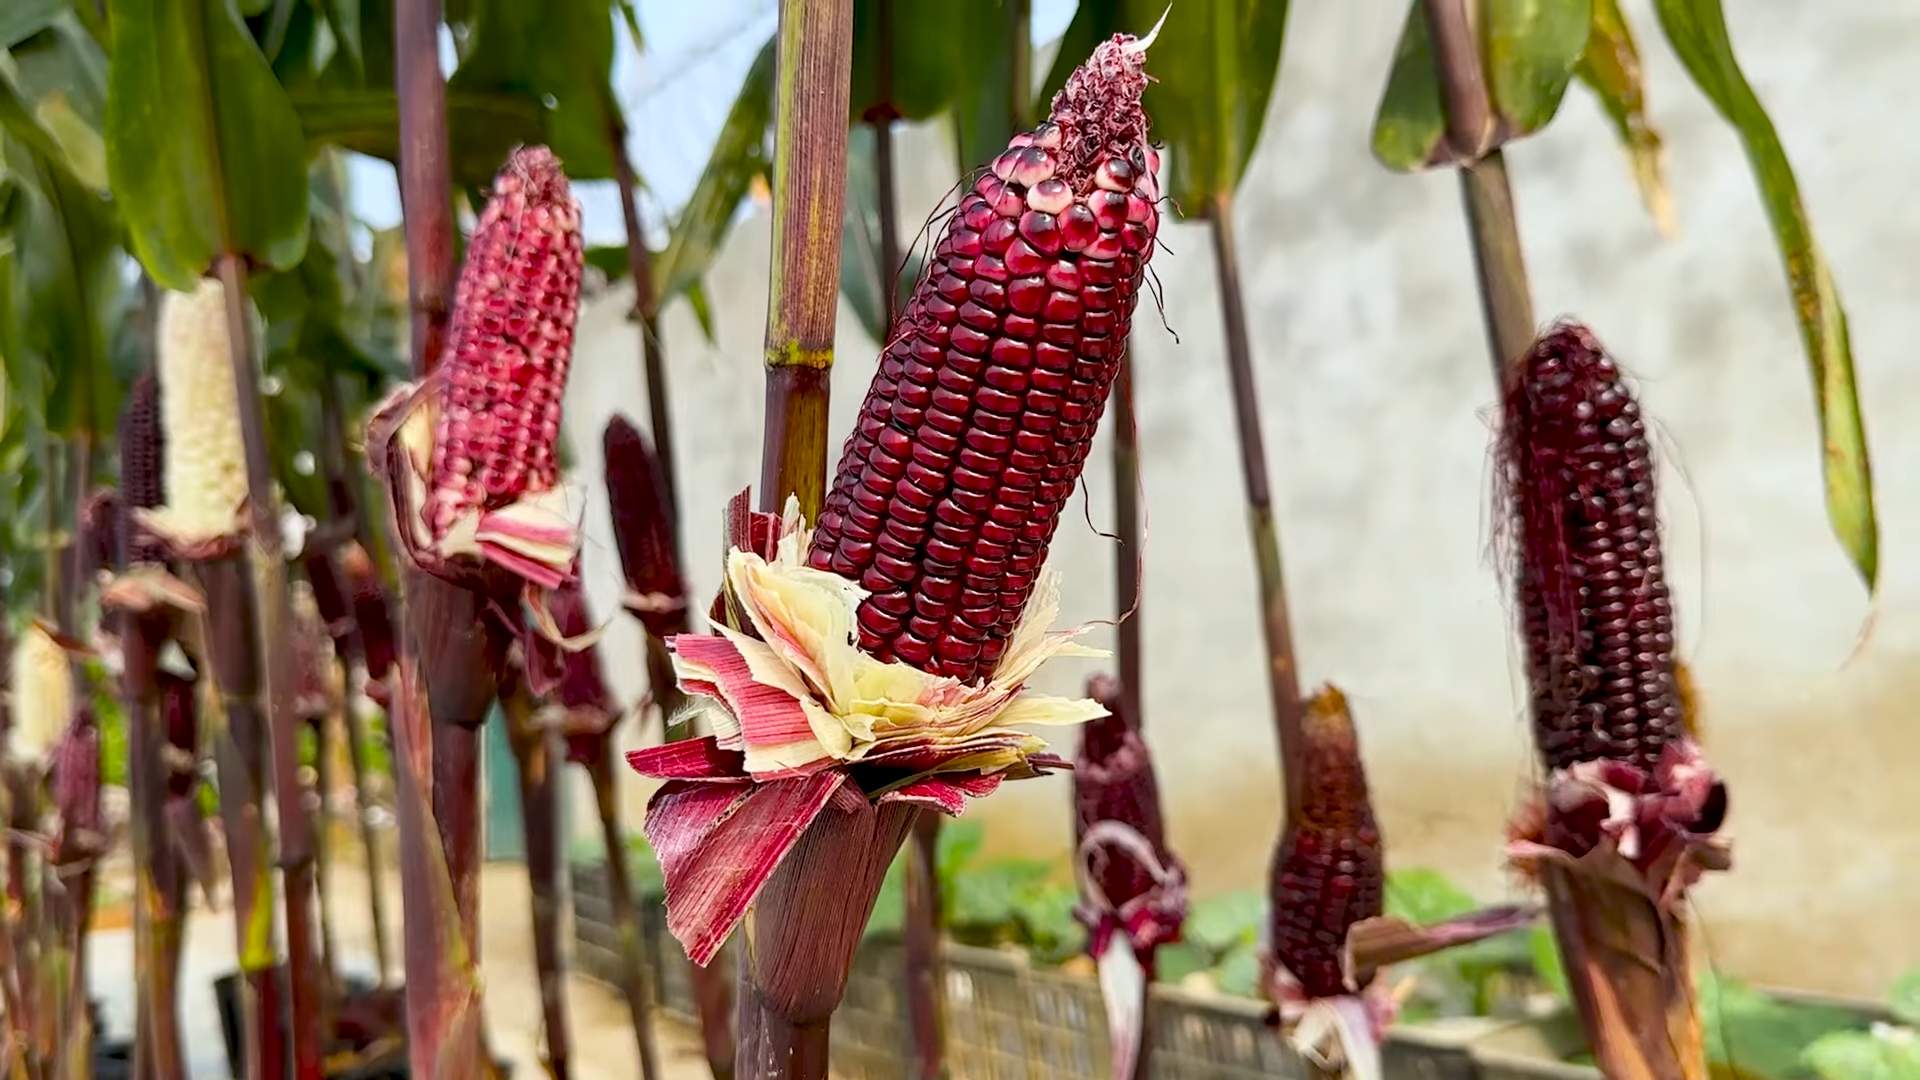
* Corn Variety: Select a corn variety that’s suitable for container growing and your climate. Shorter varieties, like ‘On Deck’ or ‘Trinity’, are generally better suited for containers.
Gathering Your Supplies
Now that we’ve planned, let’s get our hands on the stuff we need.
* Large Containers (20+ gallons per plant): As mentioned, fabric pots are fantastic.
* High-Quality Potting Mix: Don’t use garden soil! It’s too heavy and doesn’t drain well. Use a lightweight potting mix specifically designed for containers.
* Corn Seeds: Choose a variety that’s right for your climate and container growing.
* Slow-Release Fertilizer: Corn is a heavy feeder. A slow-release fertilizer will provide nutrients throughout the growing season.
* Watering Can or Hose: For watering, obviously!
* Trowel or Shovel: For planting and working with the soil.
* Gardening Gloves: To keep your hands clean and protected.
* Windbreak Materials (optional): Trellis, screen, or other sturdy materials.
* Mulch (optional): To help retain moisture and suppress weeds. Straw or wood chips work well.
* Bird Netting (optional): Birds love corn seeds and young seedlings.
Planting Your Corn
Alright, let’s get those seeds in the ground!
1. Prepare Your Containers: Fill your containers with potting mix, leaving a few inches of space at the top.
2. Plant the Seeds: Plant 3-4 seeds per container, about 1-2 inches deep. Space them evenly around the container.
3. Water Thoroughly: Water the containers gently but thoroughly after planting. Make sure the soil is moist but not soggy.
4. Thin the Seedlings: Once the seedlings emerge (usually in 7-10 days), thin them to one strong plant per container. Choose the healthiest-looking seedling and snip off the others at the soil line. Don’t pull them out, as this can disturb the roots of the remaining seedling.
Caring for Your Rooftop Corn
This is where the real work begins. Corn needs consistent care to thrive.
1. Watering: Water deeply and regularly, especially during hot, dry weather. Corn needs about 1 inch of water per week. Check the soil moisture regularly and water when the top inch feels dry.
2. Fertilizing: Corn is a heavy feeder, so fertilize regularly. Use a balanced fertilizer (e.g., 10-10-10) every 2-3 weeks. You can also side-dress with compost or manure.
3. Pollination: Corn is wind-pollinated, so you’ll need to help it along, especially if your rooftop is sheltered. When the tassels (the male flowers at the top of the plant) appear, gently shake the stalks to release pollen. You can also hand-pollinate by collecting pollen from the tassels and dusting it onto the silks (the female flowers that emerge from the developing ears of corn). Do this in the morning when the pollen is most active.
4. Weed Control: Keep your containers free of weeds. Hand-pull any weeds that emerge. Mulch can help suppress weed growth.
5. Pest and Disease Control: Keep an eye out for pests and diseases. Common corn pests include corn earworms, aphids, and spider mites. Treat infestations promptly with insecticidal soap or neem oil. Common corn diseases include rust and leaf blight. Ensure good air circulation and avoid overhead watering to prevent these diseases. If you spot any diseased leaves, remove them immediately.
6. Wind Protection: Make sure your windbreaks are in place and functioning properly. You may need to adjust them as the corn grows taller.
7. Stalk Support: As the corn stalks grow taller, they may need additional support. You can use stakes or trellises to help keep them upright.
Harvesting Your Corn
The moment you’ve been waiting for!
1. Check for Ripeness: Corn is typically ready to harvest about 20-25 days after the silks emerge. The silks will turn brown and dry. The ears should feel plump and full.
2. Test a Kernel: Peel back the husk and puncture a kernel with your fingernail. If the liquid is milky, the corn is ready to harvest. If the liquid is clear, it’s not quite ready. If the liquid is doughy, it’s overripe.
3. Harvest the Ears: To harvest, grasp the ear firmly and twist it downward. The ear should snap off easily.
4. Enjoy Your Harvest! Freshly harvested corn is the best! Cook it right away for the sweetest flavor.
Troubleshooting
Even with the best planning, things can sometimes go wrong. Here are a few common problems and how to fix them.
* Poor Pollination: If your ears of corn are poorly filled, it’s likely due to poor pollination. Make sure you’re hand-pollinating regularly, especially during hot, dry weather.
* Stunted Growth: Stunted growth can be caused by a variety of factors, including nutrient deficiencies, pests, and diseases. Check the soil pH and nutrient levels. Treat any pest or disease problems promptly.
* Yellowing Leaves: Yellowing leaves can be a sign of nutrient deficiencies, especially nitrogen. Fertilize with a nitrogen-rich fertilizer.
* Falling Over: If your corn stalks are falling over, it’s likely due to wind or lack of support. Make sure your windbreaks are in place and that your stalks are adequately supported.
Important Considerations for Rooftop Gardening
Beyond the specifics of corn, here are some general rooftop gardening tips:
* Waterproofing: Ensure your roof is properly waterproofed to prevent leaks. Consider using a waterproof membrane under your containers.
* Weight Distribution: Distribute the weight of your containers evenly across the roof to avoid overloading any one area.
* Maintenance: Regularly inspect your roof for leaks or damage. Clean up any debris that accumulates.
* Local Regulations: Check with your local authorities to see if there are any regulations regarding rooftop gardening.
Growing corn on your roof is a rewarding experience. It takes some effort, but the taste of freshly harvested corn is well worth it. Good luck, and happy gardening! I hope you have a bountiful harvest!
Conclusion
So, there you have it! Transforming your rooftop into a thriving cornfield might sound ambitious, but with this simple DIY trick, it’s surprisingly achievable. We’ve walked you through the process, highlighting the key steps and considerations for successful rooftop corn growing. But why should you even bother?
Think about it: fresh, homegrown corn, bursting with flavor, just steps from your kitchen. No more relying on store-bought varieties that may have traveled hundreds of miles. You’ll know exactly where your food comes from and how it was grown, ensuring the highest quality and nutritional value. Plus, you’ll be contributing to a more sustainable lifestyle by reducing your carbon footprint and supporting local food production, even if “local” means your own roof!
Beyond the practical benefits, rooftop corn growing offers a unique and rewarding experience. It’s a chance to connect with nature, learn about the growing process, and witness the miracle of life unfold before your eyes. Imagine the satisfaction of harvesting your own corn and sharing it with family and friends. It’s a conversation starter, a source of pride, and a delicious way to enjoy the fruits (or rather, the vegetables) of your labor.
This DIY rooftop corn growing method is a game-changer for urban gardeners. It allows you to maximize your space, utilize otherwise unused areas, and create a beautiful and productive green oasis in the heart of the city.
But don’t just take our word for it. We encourage you to try this DIY trick for yourself and experience the magic of rooftop corn growing firsthand. Experiment with different corn varieties to find your favorites. Consider companion planting with beans and squash to create a thriving Three Sisters garden on your roof. You could even try building a small trellis system to support taller corn stalks or adding a drip irrigation system for efficient watering. The possibilities are endless!
We’re confident that you’ll be amazed by the results. And we want to hear all about your experiences! Share your photos, tips, and stories with us in the comments below. Let’s build a community of rooftop corn growers and inspire others to embrace this innovative and rewarding gardening technique. So, grab your seeds, gather your supplies, and get ready to transform your rooftop into a corn-filled paradise! Happy growing!
Frequently Asked Questions (FAQ)
Q: Is rooftop corn growing really possible? I live in an apartment building.
A: Absolutely! Rooftop corn growing is definitely possible, even in apartment buildings. The key is to ensure that your rooftop can support the weight of the containers and soil, and that you have access to adequate sunlight (at least 6-8 hours per day). Check with your building management or landlord to confirm any restrictions or regulations regarding rooftop gardening. If you’re concerned about weight, consider using lightweight potting mixes and smaller containers. You can also explore options like raised beds made from lightweight materials. Remember to prioritize safety and ensure that your setup is stable and secure.
Q: What kind of corn should I grow on my rooftop?
A: The best type of corn to grow on your rooftop depends on your climate, space, and personal preferences. Shorter varieties, such as sweet corn or ornamental corn, are generally better suited for container growing. Look for varieties that are specifically bred for smaller spaces or shorter growing seasons. Some popular choices include ‘On Deck’ sweet corn, ‘Golden Bantam’ sweet corn, and ‘Strawberry Popcorn’. Do some research to find varieties that are well-suited to your local climate and growing conditions. Consider factors like disease resistance, maturity time, and ear size when making your selection.
Q: How much sunlight does rooftop corn need?
A: Corn requires a lot of sunlight to thrive. Aim for at least 6-8 hours of direct sunlight per day. If your rooftop is partially shaded, try to position your containers in the sunniest spot. You can also use reflective materials, such as white paint or aluminum foil, to bounce sunlight onto your plants. If you’re struggling to provide enough natural light, consider supplementing with grow lights.
Q: What kind of soil should I use for rooftop corn growing?
A: Use a well-draining potting mix that is rich in organic matter. Avoid using garden soil, as it can become compacted in containers and restrict root growth. You can amend your potting mix with compost, aged manure, or other organic materials to improve its fertility and drainage. Consider using a potting mix specifically formulated for vegetables.
Q: How often should I water my rooftop corn?
A: Corn requires consistent moisture, especially during hot weather. Water deeply and regularly, ensuring that the soil is evenly moist but not waterlogged. Check the soil moisture level daily and water when the top inch feels dry to the touch. Consider using a drip irrigation system or soaker hoses to provide efficient and consistent watering.
Q: How do I pollinate my rooftop corn?
A: Corn is wind-pollinated, so you’ll need to help the process along if you’re growing it in a confined space like a rooftop. When the tassels (the male flowers at the top of the plant) begin to shed pollen, gently shake the stalks to release the pollen. You can also collect the pollen in a container and manually apply it to the silks (the female flowers that emerge from the developing ears). Repeat this process every day for several days to ensure good pollination.
Q: How do I fertilize my rooftop corn?
A: Corn is a heavy feeder, so it’s important to fertilize it regularly. Use a balanced fertilizer that is specifically formulated for vegetables. Apply fertilizer according to the package directions, typically every 2-3 weeks. You can also supplement with organic fertilizers, such as compost tea or fish emulsion.
Q: How do I protect my rooftop corn from pests and diseases?
A: Monitor your plants regularly for signs of pests and diseases. Common pests of corn include corn earworms, aphids, and spider mites. Common diseases include corn smut and leaf blight. Use organic pest control methods, such as insecticidal soap or neem oil, to control pests. Ensure good air circulation to prevent diseases.
Q: When is rooftop corn ready to harvest?
A: Corn is typically ready to harvest about 60-90 days after planting, depending on the variety. The silks will turn brown and dry, and the ears will feel plump and full. To test for ripeness, peel back a portion of the husk and puncture a kernel with your fingernail. If the liquid is milky, the corn is ready to harvest. If the liquid is clear, it needs more time. If the liquid is doughy, it’s overripe.
Q: Can I grow other vegetables alongside my rooftop corn?
A: Yes, you can definitely grow other vegetables alongside your rooftop corn! Companion planting can be a great way to maximize your space and improve the health of your plants. Good companion plants for corn include beans, squash, cucumbers, and melons. Avoid planting corn near tomatoes or brassicas (such as cabbage and broccoli), as they can compete for nutrients.
Q: What if my rooftop doesn’t get enough sunlight? Can I still grow corn?
A: If your rooftop doesn’t get enough sunlight, you can try supplementing with grow lights. Choose grow lights that are specifically designed for plants and provide a full spectrum of light. Position the grow lights close to your plants and adjust the height as they grow. You may also need to adjust your watering and fertilization schedule to compensate for the reduced sunlight. While grow lights can help, remember that natural sunlight is always the best option for healthy plant growth.
Q: Is rooftop corn growing environmentally friendly?
A: Yes, rooftop corn growing can be very environmentally friendly! It reduces your carbon footprint by minimizing transportation of food, conserves water by using efficient watering methods, and provides habitat for pollinators and other beneficial insects. It also helps to reduce urban heat island effect and improve air quality. By growing your own food, you’re contributing to a more sustainable and resilient food system.


Leave a Comment