
Scrub Daddy Cleaning Tips: Who knew a smiley-faced sponge could become such a cleaning sensation? I remember when I first saw the Scrub Daddy, I was skeptical. But after trying it, I was hooked! This little guy isn’t just cute; it’s a powerhouse when it comes to tackling grime and dirt around the house. From the kitchen to the bathroom, the Scrub Daddy has proven its versatility and effectiveness.
The story of the Scrub Daddy is a true American success story, born from a simple need and a clever invention. While it might not have ancient roots, its impact on modern cleaning routines is undeniable. It’s become a staple in households across the country, and for good reason.
Let’s face it, cleaning isn’t anyone’s favorite chore. But with the right tools and techniques, it can be a whole lot easier and even a little bit fun! That’s where these Scrub Daddy Cleaning Tips come in. I’m going to share some of my favorite DIY hacks and tricks to maximize the cleaning power of your Scrub Daddy. Whether you’re dealing with stubborn stains, greasy messes, or just want to keep your home sparkling, these tips will help you get the job done quickly and efficiently. Get ready to unlock the full potential of your smiley-faced cleaning companion!
Unlock the Scrub Daddy’s Full Potential: Amazing Cleaning Hacks You Need to Know!
Hey there, fellow cleaning enthusiasts! I’m about to let you in on some secrets that will transform your relationship with your trusty Scrub Daddy. You know, that smiley-faced sponge that’s been staring back at you from the sink? Well, it’s capable of so much more than just washing dishes. Get ready to be amazed!
Understanding Your Scrub Daddy: Temperature is Key!
Before we dive into the hacks, let’s quickly recap what makes the Scrub Daddy so special. It’s all about the FlexTexture material! In warm water, it becomes soft and pliable, perfect for gentle cleaning. In cold water, it firms up, providing serious scrubbing power. This temperature-activated texture change is the key to its versatility. Keep this in mind as we go through these hacks!
Hack #1: Microwave Cleaning Powerhouse
Is your microwave looking like a Jackson Pollock painting gone wrong? Don’t worry, the Scrub Daddy is here to help! This is one of my absolute favorite hacks because it’s so quick and effective.
What You’ll Need:
* Your Scrub Daddy
* A microwave-safe bowl
* Water
* Lemon juice or vinegar (optional, but recommended)
Step-by-Step Instructions:
1. Prepare the Cleaning Solution: Fill the microwave-safe bowl with about a cup of water. Add a tablespoon of lemon juice or vinegar. This will help loosen the grime and deodorize your microwave. I personally love using lemon juice for the fresh scent!
2. Soak the Scrub Daddy: Thoroughly wet your Scrub Daddy with the lemon-water mixture. Squeeze out any excess water, but leave it damp.
3. Microwave Magic: Place the damp Scrub Daddy inside the bowl of water in your microwave. Microwave on high for 1 minute. This will create steam that loosens the stuck-on food particles.
4. Let it Sit (Briefly!): Carefully remove the bowl (it will be hot!) and let the microwave sit for another minute or two with the door closed. This allows the steam to continue working its magic.
5. Wipe Away the Mess: Now, using the warm, softened Scrub Daddy, wipe down the interior of your microwave. You’ll be amazed at how easily the grime comes off! For stubborn spots, use the firmer texture by running the Scrub Daddy under cold water briefly.
6. Final Touches: Use a clean, damp cloth to wipe away any remaining residue. And voila! A sparkling clean microwave.
Hack #2: Revive Your Grout
Grout can be a real pain to clean. It’s porous and easily absorbs dirt and grime. But fear not, the Scrub Daddy, especially when firm, is an excellent grout cleaner!
What You’ll Need:
* Your Scrub Daddy
* Baking soda
* Water
* An old toothbrush (optional, for really stubborn areas)
Step-by-Step Instructions:
1. Make a Baking Soda Paste: In a small bowl, mix baking soda with just enough water to form a thick paste. Baking soda is a gentle abrasive that helps lift dirt and grime without scratching.
2. Apply the Paste: Apply the baking soda paste to the grout lines. You can use your fingers, a small spoon, or an old toothbrush to get the paste into the grout.
3. Let it Sit: Allow the paste to sit on the grout for about 5-10 minutes. This gives the baking soda time to work its magic.
4. Scrub Away! Wet your Scrub Daddy with cold water to make it firm. Then, scrub the grout lines vigorously. The firm texture of the Scrub Daddy will help dislodge the dirt and grime. For really stubborn areas, use the corner of the Scrub Daddy or an old toothbrush to get into those tight spaces.
5. Rinse Thoroughly: Rinse the area with clean water to remove the baking soda residue. You may need to wipe the area with a damp cloth to ensure all the residue is gone.
6. Admire Your Work: Stand back and admire your sparkling clean grout!
Hack #3: Sparkling Shower Doors
Soap scum on shower doors is the bane of my existence! But the Scrub Daddy makes tackling this chore so much easier.
What You’ll Need:
* Your Scrub Daddy
* White vinegar
* Spray bottle
* Water
Step-by-Step Instructions:
1. Prepare the Vinegar Solution: Fill a spray bottle with equal parts white vinegar and water. White vinegar is a natural cleaner and disinfectant that’s great for removing soap scum.
2. Spray the Shower Doors: Generously spray the shower doors with the vinegar solution. Make sure to cover all areas affected by soap scum.
3. Let it Sit: Allow the vinegar solution to sit on the shower doors for about 10-15 minutes. This will give the vinegar time to break down the soap scum.
4. Scrub with the Scrub Daddy: Wet your Scrub Daddy with warm water to make it soft and pliable. Then, scrub the shower doors thoroughly. The soft texture of the Scrub Daddy will help remove the soap scum without scratching the glass.
5. Rinse Thoroughly: Rinse the shower doors with clean water to remove the vinegar solution and soap scum residue.
6. Dry the Doors: Use a squeegee or a clean, dry cloth to dry the shower doors. This will prevent water spots and keep your shower doors looking sparkling clean.
Hack #4: Clean Your Blinds Like a Pro
Cleaning blinds can be tedious, but the Scrub Daddy makes it surprisingly efficient.
What You’ll Need:
* Your Scrub Daddy
* Warm water
* Dish soap (optional)
* Old socks (optional)
Step-by-Step Instructions:
1. Prepare Your Cleaning Solution: Fill a bowl with warm water. Add a few drops of dish soap if desired. The dish soap will help cut through any grease or grime on the blinds.
2. Wet the Scrub Daddy: Wet your Scrub Daddy with the warm water solution. Squeeze out any excess water.
3. Clean the Blinds: Gently pinch the Scrub Daddy around each slat of the blind and slide it across. The textured surface will grab onto dust and dirt.
4. Optional: Sock Method: For an even easier clean, cut slits in an old sock and slide it over the Scrub Daddy. This creates a larger surface area for cleaning multiple slats at once.
5. Rinse and Repeat: Rinse the Scrub Daddy frequently with clean water to remove the dirt and dust. Repeat the process until all the blinds are clean.
6. Dry the Blinds: Allow the blinds to air dry completely before closing them.
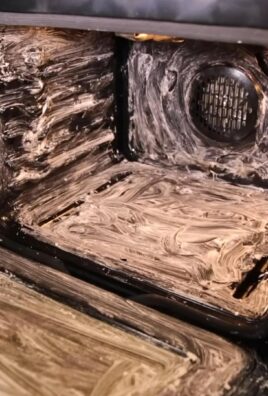
Hack #5: Degrease Your Oven Racks
Oven racks can accumulate baked-on grease and grime that’s incredibly difficult to remove. But with a little elbow grease and your Scrub Daddy, you can get them looking like new again!
What You’ll Need:
* Your Scrub Daddy
* Dish soap
* Warm water
* Large tub or bathtub
Step-by-Step Instructions:
1. Soak the Racks: Fill a large tub or bathtub with hot water and add a generous amount of dish soap. Place the oven racks in the tub and let them soak for at least 30 minutes, or even overnight for really stubborn grime.
2. Scrub with the Scrub Daddy: After soaking, use your Scrub Daddy (wet with warm water) to scrub the oven racks. The firm texture of the Scrub Daddy will help dislodge the baked-on grease and grime.
3. Rinse Thoroughly: Rinse the oven racks thoroughly with clean water to remove the soap and grime residue.
4. Dry the Racks: Dry the oven racks completely before placing them back in the oven.
Hack #6: Clean Your Car’s Interior
Believe it or not, the Scrub Daddy can also be used to clean your car’s interior! Its gentle yet effective scrubbing power makes it perfect for removing dirt and grime from dashboards, consoles, and even leather seats (test in an inconspicuous area first!).
What You’ll Need:
* Your Scrub Daddy
* Car interior cleaner
* Water
* Microfiber cloths
Step-by-Step Instructions:
1. Prepare the Cleaning Solution: Dilute your car interior cleaner according to the manufacturer’s instructions.
2. Apply the Cleaner: Spray the diluted cleaner onto the surface you want to clean.
3. Scrub Gently: Wet your Scrub Daddy with water and gently scrub the surface. Be careful not to apply too much pressure, especially on delicate surfaces like leather.
4. Wipe Clean: Use a clean, damp microfiber cloth to wipe away the cleaner and dirt residue.
5.
Conclusion
So, there you have it! Transforming your cleaning routine with these Scrub Daddy cleaning tips is not just about saving money; it’s about unlocking the full potential of this already amazing cleaning tool. We’ve explored how to maximize its scrubbing power, extend its lifespan, and even tailor it to specific cleaning tasks around your home. From reviving dull stainless steel to tackling stubborn bathroom grime, the versatility of the Scrub Daddy, enhanced by these simple DIY techniques, is truly remarkable.
Why is this a must-try? Because it’s efficient, economical, and environmentally conscious. You’re not just cleaning; you’re cleaning smarter. You’re reducing waste by prolonging the life of your Scrub Daddy, and you’re potentially avoiding the need for harsh chemical cleaners by leveraging its unique texture and shape in creative ways.
Consider these variations to further personalize your Scrub Daddy experience:
* **Essential Oil Infusion:** Add a few drops of your favorite essential oil (lemon, tea tree, or lavender are great choices) to your Scrub Daddy before cleaning for a refreshing and aromatic experience. Be mindful of the surfaces you’re cleaning, as some essential oils can react with certain materials.
* **Targeted Texture Zones:** Use a sharp knife (carefully!) to create small slits or grooves in specific areas of your Scrub Daddy. This can create zones with varying degrees of abrasiveness, perfect for tackling different types of messes. For example, a more textured zone could be ideal for baked-on food, while a smoother zone could be used for delicate surfaces.
* **Color-Coded Cleaning:** Designate different colored Scrub Daddies for different areas of your home to prevent cross-contamination. Use one color for the kitchen, another for the bathroom, and so on. This is especially important for households with young children or individuals with allergies.
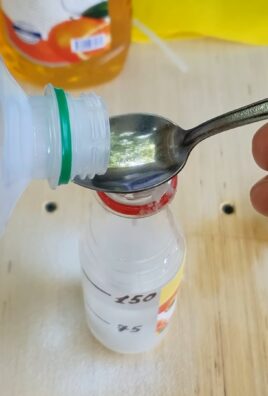
* Vinegar Soak for Stubborn Stains: For particularly tough stains, soak your Scrub Daddy in a solution of equal parts white vinegar and water for 30 minutes before using. The vinegar will help to loosen the grime, making it easier to scrub away.
We’re confident that these Scrub Daddy cleaning tips will revolutionize the way you approach household chores. They’re simple, effective, and adaptable to your specific needs. Don’t just take our word for it – try them out for yourself!
We encourage you to experiment with these techniques and discover what works best for you. The beauty of DIY is that it’s all about customization and finding solutions that fit your unique lifestyle.
Once you’ve given these tips a try, we’d love to hear about your experience! Share your before-and-after photos, your favorite variations, and any other creative uses you’ve discovered for your Scrub Daddy in the comments below. Let’s build a community of savvy cleaners who are passionate about making their homes sparkle! Your insights could inspire others to embrace these simple yet powerful techniques and unlock the full potential of their own Scrub Daddies. Happy cleaning!
Frequently Asked Questions (FAQ)
What exactly *is* a Scrub Daddy, and why is it so popular?
The Scrub Daddy is a unique cleaning sponge known for its FlexTexture material. This material changes texture based on water temperature: it’s firm in cold water for tough scrubbing and soft in warm water for gentle cleaning. Its smiley face design isn’t just cute; the eyes provide a comfortable grip, and the mouth is perfect for cleaning utensils. Its popularity stems from its versatility, durability, and effectiveness in tackling a wide range of cleaning tasks.
How do I clean my Scrub Daddy itself?
Keeping your Scrub Daddy clean is essential for hygiene and longevity. There are several effective methods:
* **Dishwasher:** The Scrub Daddy is dishwasher safe! Simply place it on the top rack and run a normal cycle.
* **Microwave:** Wet the Scrub Daddy thoroughly and microwave it for 1-2 minutes. This will kill most bacteria. Be cautious when removing it, as it will be hot.
* **Boiling:** Boil the Scrub Daddy in water for a few minutes to sanitize it.
* **Vinegar Soak:** Soak the Scrub Daddy in a solution of equal parts white vinegar and water for 30 minutes to disinfect and remove odors.
* Bleach Solution: For a deep clean, soak the Scrub Daddy in a diluted bleach solution (1 tablespoon of bleach per gallon of water) for no more than 5 minutes. Rinse thoroughly afterward.
How long should a Scrub Daddy last?
With proper care, a Scrub Daddy can last for several months. Its lifespan depends on how frequently it’s used and the types of messes it’s used to clean. Regularly cleaning your Scrub Daddy, as described above, will significantly extend its lifespan. If you notice it becoming excessively worn, torn, or developing a persistent odor, it’s time to replace it.
Can I use a Scrub Daddy on all surfaces?
While the Scrub Daddy is generally safe for most surfaces, it’s always a good idea to test it in an inconspicuous area first, especially on delicate or easily scratched materials. Avoid using it on surfaces that are known to be sensitive to abrasives, such as polished wood or certain types of plastic. When in doubt, use warm water to soften the Scrub Daddy and reduce its abrasiveness.
Is the Scrub Daddy antibacterial?
The Scrub Daddy itself is not inherently antibacterial. However, its open-pore design allows it to dry quickly, which helps to inhibit bacterial growth. Regularly cleaning and sanitizing your Scrub Daddy, as outlined above, is crucial for maintaining hygiene and preventing the spread of germs.
Can I use the Scrub Daddy with harsh chemicals?
While the Scrub Daddy is durable, it’s best to avoid using it with harsh chemicals like bleach or strong solvents on a regular basis. These chemicals can degrade the material over time and shorten its lifespan. If you do need to use it with chemicals, rinse it thoroughly afterward to remove any residue.
What are some creative uses for the Scrub Daddy besides cleaning dishes?
The Scrub Daddy’s versatility extends far beyond the kitchen sink. Here are a few creative uses:
* **Cleaning bathroom tiles and grout:** Its textured surface is perfect for scrubbing away soap scum and mildew.
* **Removing bugs from car windshields:** The FlexTexture material is gentle enough not to scratch the glass but effective at removing stubborn bug splatters.
* **Cleaning outdoor furniture:** Use it to scrub away dirt and grime from patio furniture, grills, and other outdoor surfaces.
* **Exfoliating skin (gently!):** Some people use a soft, warm Scrub Daddy to gently exfoliate their skin. Be sure to use a clean, new Scrub Daddy and avoid using it on sensitive areas.
* **Removing pet hair from upholstery:** The textured surface can help to lift pet hair from furniture and carpets.
Where can I buy a Scrub Daddy?
Scrub Daddies are widely available at most major retailers, including grocery stores, department stores, and online marketplaces like Amazon. You can also find them at specialty cleaning supply stores.
Is the Scrub Daddy environmentally friendly?
While the Scrub Daddy is not biodegradable, its durability and long lifespan make it a more environmentally friendly option than disposable sponges. By properly caring for your Scrub Daddy and extending its lifespan, you can reduce waste and minimize your environmental impact. Consider recycling your Scrub Daddy through specialized programs if available in your area.

Leave a Comment