Easy DIY Twine Pumpkins: Beautiful Fall Decor Ideas
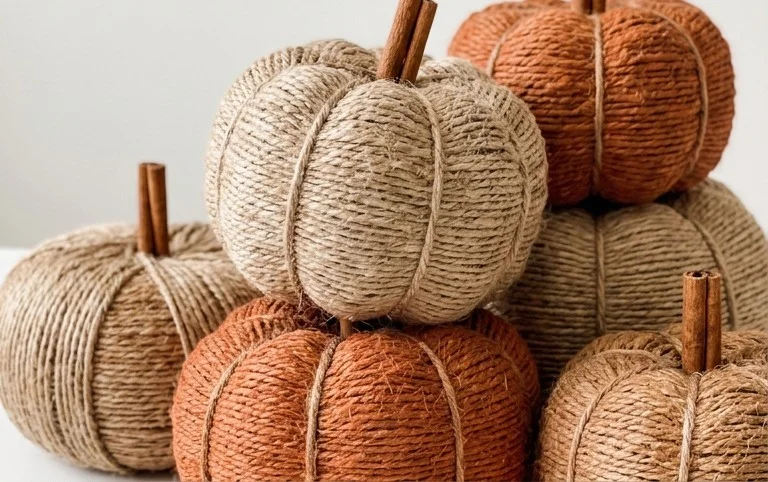
DIY Twine Pumpkins are the perfect way to bring a touch of cozy, handmade charm to your home this fall! Are you tired of looking at bare surfaces and wishing for that warm, autumnal feel, but dread the thought of expensive store-bought decorations or cluttered shelves? I know I was! Imagine your mantelpiece or a side table adorned with these adorable, rustic pumpkins, each one unique and lovingly crafted. They add a touch of natural beauty and a delightful pop of texture without breaking the bank – think just a few dollars and a couple of hours of your time. In this article, I’ll walk you through exactly how to create these charming decorations, sharing simple steps and helpful tips so you can fill your home with beautiful, handmade fall spirit.
DIY Twine Pumpkins: Simple, Beautiful, and Budget-Friendly Fall Decor
As the leaves begin to turn and a crisp chill fills the air, my home transforms into a cozy haven, and fall decor is an absolute must. While store-bought decorations can be lovely, there’s a special magic in crafting your own. This year, I’m particularly excited about a project that’s not only stunningly simple but also incredibly budget-friendly: DIY twine pumpkins. They bring a warm, rustic charm to any space, and the best part is, they require minimal tools and materials. Let’s dive into how you can create your own collection of these charming fall accents.
Gathering Your Twine Pumpkin Essentials
One of the best things about this DIY is how accessible the materials are. You likely have some of these items around your house already!
* **Twine:** This is your star ingredient. For one medium-sized pumpkin (about 6-8 inches in diameter), you’ll need roughly 100-150 yards of twine. Jute twine is a classic choice and readily available. You can find a 150-yard spool for around $4-$7, depending on the brand and thickness. I like to have a few spools on hand, maybe 2-3 for a decent-sized batch of pumpkins.
* **Cardboard:** Any sturdy cardboard will do. Old shipping boxes, cereal boxes (if you have a lot!), or even thick cardstock can work. I usually raid my recycling bin for this. You’ll need a piece large enough to cut out your pumpkin shapes, perhaps a square measuring 12×12 inches for a few smaller pumpkins. This is essentially free if you’re recycling.
* **Glue:** A good quality craft glue or a hot glue gun with plenty of glue sticks is essential. Craft glue will give you a stronger hold but requires drying time. A hot glue gun is faster but can be trickier to work with for a smooth finish. For a large batch, a standard bottle of craft glue (around $3-$5) or a pack of hot glue sticks (around $5-$7 for a multipack) will suffice.
* **Scissors:** A sharp pair of scissors is crucial for cutting the cardboard cleanly.
* **Pencil or Pen:** For drawing your pumpkin shapes.
* **Optional: Paint and Paintbrush:** If you want to add a pop of color or a more traditional pumpkin hue, acrylic paints are perfect. A small bottle of orange or white acrylic paint is usually under $2.
* **Optional: Twigs or Craft Sticks:** For the pumpkin stem. Natural twigs are free from your yard, or you can buy a small pack of craft sticks for a couple of dollars.
**Rough Estimated Cost:** If you need to purchase everything, you’re looking at a very affordable range of $15-$30 for enough supplies to make several pumpkins, depending on sales and brands. If you have twine and cardboard already, your cost could be as low as $5-$10 for glue and a little paint.
Measuring and Planning for Your Perfect Pumpkins
Before you start cutting and gluing, a little planning goes a long way.
* **Size Matters:** Decide on the size of your pumpkins. For a cohesive display, I like to make a mix of sizes. A good starting point for a medium pumpkin is a circle about 6-8 inches in diameter. For smaller ones, aim for 3-4 inches. You can even make tiny ones for fairy gardens or dollhouses!
* **Shape Inspiration:** While we’re making pumpkins, they don’t need to be perfectly round. A slightly flattened or elongated oval shape can add character. You can even draw slightly lobed edges to mimic the natural curves of a real pumpkin.
* **Quantity:** Think about where you want to display your pumpkins. A mantelpiece might hold 3-5, while a tiered tray could accommodate 2-3. Consider how many you realistically need to achieve the look you desire. I usually aim for a dozen in various sizes to spread around my home.
Your Step-by-Step Twine Pumpkin Guide
Now for the fun part – creation!
1. **Cut Your Cardboard Bases:** On your cardboard, draw your chosen pumpkin shapes. Remember, these are just the bases, so they don’t need to be perfectly smooth. You can draw a circle, an oval, or even slightly scalloped edges. Cut these shapes out with your scissors. For a 6-8 inch pumpkin, you’ll want a piece of cardboard roughly that size.
2. **(Optional) Paint Your Base:** If you’re using paint, now is the time to apply it. A coat of orange acrylic paint will give you a classic pumpkin look. You can also opt for white, cream, or even a muted pastel for a more modern feel. Let it dry completely.
3. **Start Gluing the Twine:** If you’re using a hot glue gun, apply a small dot of glue to the edge of your cardboard base. Immediately press the end of your twine into the glue and hold for a few seconds until it adheres. If you’re using craft glue, apply a thin bead of glue along the edge and press the twine into it, holding until it sticks.
4. **Wrap Your Pumpkin:** Begin wrapping the twine around the cardboard base, working your way inwards. Apply glue every few inches to ensure the twine stays securely in place. Try to wrap the twine as tightly and smoothly as possible, overlapping slightly to avoid gaps. Don’t worry if it’s not perfect; a little texture adds to the rustic charm.
5. **Continue Until Covered:** Keep wrapping and gluing, spiraling your way towards the center of your cardboard shape. You want to completely cover the cardboard so that none of it shows through.
6. **Finishing the Center:** Once you reach the center, apply a final dab of glue and press the end of the twine firmly into it. Trim any excess twine.
7. **Add Your Stem:** If you’re adding a stem, cut a small piece of twig or craft stick to your desired length. Apply glue to one end of the stem and firmly press it into the center of your pumpkin, on top of where you finished wrapping the twine. Hold until secure.
8. **Let it Dry:** If you used craft glue, allow your pumpkins to dry completely according to the glue manufacturer’s instructions. This might take a few hours. Hot glue dries almost instantly.
Adapting for Small Spaces and Rentals
The beauty of these twine pumpkins is their versatility, especially if you’re working with limited space or in a rental property where drilling or permanent fixtures are a no-go.
* **No-Drill Stems:** For rental spaces, skip the glue-on stem altogether. You can simply leave the top of the twine pumpkin as is, or you can tuck a small, dried leaf or a bit of faux greenery into the twine at the top to mimic a stem. This requires no adhesive and can be easily removed.
* **Lightweight and Portable:** These pumpkins are incredibly lightweight, making them perfect for shelves, windowsills, or even as part of a larger centerpiece. They don’t require any wall mounting or heavy-duty support.
* **Stacking and Grouping:** In a small space, stacking a few smaller pumpkins or grouping them together creates a charming display without taking up too much real estate. A single small twine pumpkin can look lovely on a bedside table or a desk.
Styling Your Twine Pumpkin Creations
Once your twine pumpkins are made, the fun of styling begins!
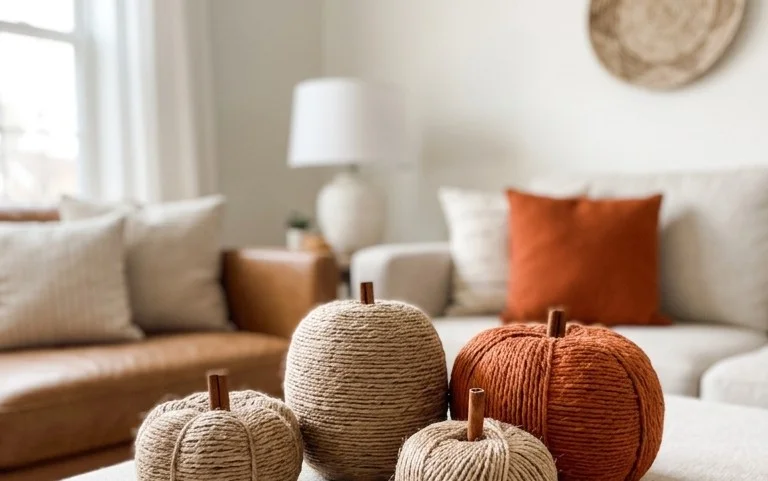
* **Color Palette:** While orange is classic, don’t be afraid to experiment. White, cream, natural jute, or even muted greens and blues can create a sophisticated fall look. I love a mix of natural jute and painted white pumpkins for a softer aesthetic.
* **Texture Play:** The twine itself provides fantastic texture. Pair your twine pumpkins with other natural elements like dried leaves, pinecones, acorns, or even faux eucalyptus for added depth and visual interest.
* **Placement is Key:**
* **Mantelpiece Magic:** Arrange a collection of 3-5 pumpkins in varying sizes down your mantel. Tuck in some greenery or a string of fairy lights for extra warmth.
* **Tiered Tray Charm:** A tiered tray is a perfect canvas for a smaller grouping of twine pumpkins. Mix them with other fall-themed miniatures, candles, or small decorative objects.
* **Entryway Welcome:** Place a larger twine pumpkin on your entryway table with a few smaller ones clustered around its base.
* **Cozy Corners:** A single, well-placed twine pumpkin can add a touch of autumn to a bookshelf, a coffee table, or a windowsill.
* **Mixing with Other Decor:** Don’t be afraid to mix your DIY twine pumpkins with other fall decor. They look fantastic alongside ceramic pumpkins, fall-themed candles, or even knitted throws.
Keeping Your Twine Pumpkins Tidy After Week One
The beauty of these DIY pumpkins is their durability and low maintenance.
* **Gentle Dusting:** After a week or two, you might notice a light layer of dust. A soft paintbrush or a feather duster is usually all you need to gently whisk away any dust. Avoid damp cloths, as this can damage the twine or the glue.
* **Resistant to Light Damage:** Unlike some delicate ornaments, these twine pumpkins are quite robust. They are unlikely to get damaged from minor bumps or knocks.
* **Storage:** When the season is over, store them in a dry place. A plastic bin or a cardboard box works well. Ensure they are not packed too tightly to avoid crushing.
Common Mistakes That Make These DIY Pumpkins Fail
Even with a simple project, a few common pitfalls can prevent your twine pumpkins from reaching their full potential.
* **Poor Cardboard Choice:** Using very flimsy cardboard can lead to a saggy, misshapen pumpkin. Opt for sturdy corrugated cardboard for the best results.
* **Not Enough Glue:** This is a big one! If you don’t use enough glue to secure the twine, it will start to unravel, especially around the edges and in the center. Be generous with the glue, but not so much that it oozes out excessively.
* **Wrapping Too Loosely:** If you wrap the twine too loosely, you’ll end up with large gaps and a pumpkin that looks unfinished. Aim for tight, overlapping wraps.
* **Skipping the Base Coat (Sometimes):** While you *can* wrap directly onto cardboard, painting the base first, especially with lighter colored twine, helps create a more uniform and opaque finish. If you’re using dark twine, this is less of an issue.
* **Rushing the Drying Process:** If you’re using craft glue, don’t try to move or style your pumpkins before they are completely dry. This will lead to a sticky mess and potentially unraveling twine.
With these tips and a little bit of crafting fun, you’ll have a beautiful, handmade collection of fall decor that adds warmth and personality to your home. Happy crafting!
Conclusion
Creating your own festive decorations can bring a wonderful sense of warmth and accomplishment to your home. These DIY twine pumpkins are more than just charming accents; they inject a touch of handmade beauty into your everyday spaces, making those ordinary moments feel a little more special. The smallest possible first step? Grab a roll of twine and a toilet paper tube this afternoon – you’ll be surprised how quickly you can create your first little pumpkin!
Variations to Consider:
For a touch of rustic elegance in your living room, try a larger twine pumpkin adorned with a few faux leaves. On a tighter budget, smaller twine pumpkins can be a delightful addition to a bookshelf or a window sill, adding seasonal cheer without a big spend.
We hope this project inspires you to embrace the beauty of handmade decor. Keep exploring our ideas for more ways to bring your home to life!